Category Archives: Programming

Как запускать скрипты на Python прямо из WordPress

1. В вордпрессе устанавливаем плагин Insert PHP.

2. В новый пост или страницу вставляем код, где указываем полный путь до питонного скрипта:

[insert_php]
$python = `python /home/user/hello.py`;
echo $python;
[/insert_php]

3. А сам питонный скрипт такой:

#!/usr/bin/python

print("Hello World!")

Просто.

Случайная точка: Cairo и Python

circle

При помощи Кайро точку нарисовать просто, но как рассчитать, чтоб точка не вылазила за пределы круга?

– При помощи теоремы Пифагора.

Cairo – библиотека 2D векторной графики.
Python – интерпретатор и программный язык.

Мы рассмотрим только пример X координаты. Круг, как известно, квадратный, а Пифагоровы штаны во все стороны равны, поэтому для Y координаты все расчеты будут те же самые, только с другими буквами.

Нулевая точка XY координат в Cairo начинается в левом верхнем углу картинки. X0 – по горизонтали, Y0 – по вертикали. А координаты круга начинаются в середине картинки и отстоят от Cairo на расстояние радиус + каёмка в 10 пикселей.

circle1

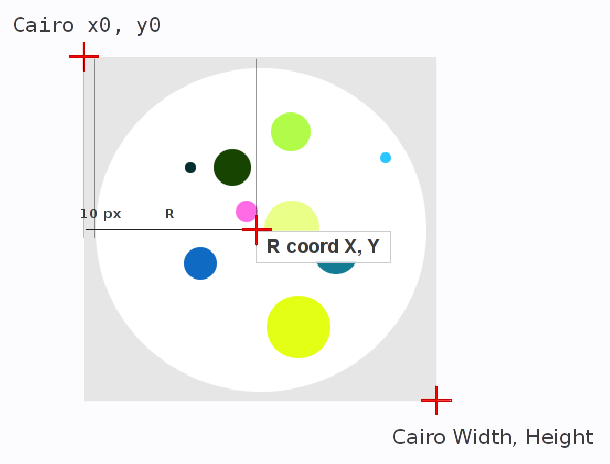
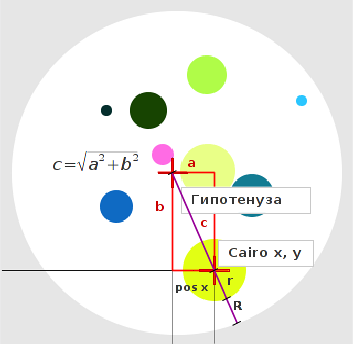
Поэтому относительно центральной точки (нулевой для круга) мы отнимаем абсолютные значения xy позиции точки, чтоб узнать относительную величину сторон квадрата, диагональ которого не должна превышать расстояние разницы радиуса круга и радиуса точки.

a=X-x

circle2

Если условие выполнимое, мы считаем координаты точки приемлемыми, а если нет, то игнорируем их.

Мы оперируем абсолютными значениями числа без учета его знака, потому что местоположение точки относительно центра круга нам безразлично.

abs(a)

Нас интересует длиннее ли диагональ прямоугольника длины R радиуса круга минус r радиуса точки или нет.

if math.sqrt(abs(a) ** 2 + abs(b) ** 2) < R-r

Если нет, то точка хорошая, и мы ее рисуем. Если да – точка плохая, мы ее пропускаем и при помощи генератора случайных чисел получаем следующую.

x = random.randint(0, WIDTH)

Код для Питона 2.7

#!/usr/bin/python
# -*- coding: utf-8 -*-

import cairo, random, math

''' Random dot in circle. '''

R=150 # Радиус круга
r=10  # Радиус точки
n=300 # Количество PNG фрэймов для анимации

############################################

WIDTH, HEIGHT = R*2+20, R*2+20 # Длина и ширина картинки + каемка в 
                               # 10 пикселей с каждой стороны.

X=WIDTH/2  # X позиция круга
Y=HEIGHT/2 # Y позиция круга

surface = cairo.ImageSurface (cairo.FORMAT_ARGB32, WIDTH, HEIGHT)
context = cairo.Context (surface)

# Серый задний план -----------------
context.set_source_rgb(0.9, 0.9, 0.9)
context.rectangle(0, 0, WIDTH, HEIGHT)
context.fill()

# Белый круг на заднем плане --------
context.set_source_rgb(1, 1, 1) # белый цвет круга в rgb формате
context.arc(X, Y, R, 0, 360)
context.fill()

i=0
while i < n+1:
	x = random.randint(0, WIDTH)  # абсолютные координаты точки на оси X
	y = random.randint(0, HEIGHT) # абсолютные координаты точки на оси Y

	a=x-X # относительное положение точки по отношению к центру круга
	b=y-Y

	r=random.randint(4, 30) # Случайный радиус точки от 4 до 30 пикселей

	if math.sqrt(abs(a) ** 2 + abs(b) ** 2) < R-r:

		# Случайная точка -------------------
		r_=random.random()*1.2 # Цвет в rgb формате, случайные значения.
		g_=random.random()*1.2
		b_=random.random()*1.2		

		context.set_source_rgb(r_, g_, b_)
		context.arc(x, y, r, 0*math.pi/180, 360*math.pi/180)
		context.fill()

		print i, 'x:',x,'y:',y

		filename='frame_'+'0'*(len(str(n))-len(str(i)))+str(i)+'.png'
		surface.write_to_png (filename) # Сохраняем фрэйм в PNG файл.

		i+=1

PHP Forms in WordPress

Forms are an integral part of a website. While there are lots of wordpress plugins available to create custom forms, most of them are not up to the task. It is very easy to create a form in WordPress, provided you have a fair knowledge of php, html and js. Let me show you how it’s done.

STEP #1

Front-end [HTML]

speaker-nomination-tedxceg

> Open dashboard.

> Create a new page.

> Go to HTML mode.

> Create a form just like this:

1
2
3
4
<form action="../process.php" method="post" name="myForm">
Name <input id="name" type="text" name="name" />
Email <input id="email" type="text" name="email" />
<input type="submit" value="Submit" /></form>

> Specify the backend php script in the action attribute of the form tag. Include as many form fields as you wish. Specify the method of form submission as post.

> Publish the page.

Bravo! You have successfully completed the front end of the custom form.

STEP #2

Form Validation [JS]

> Include a javascript into the page which you’ve created.

> Add a script tag:

1
2
3
4
5
<script type="text/javascript">
/* JS validation code here */
...
...
</script>

> Create a validation function:

1
2
3
4
5
6
7
8
9
10
11
12
13
14
15
16
17
18
19
function validateForm()
{
/* Validating name field */
var x=document.forms["myForm"]["name"].value;
if (x==null || x=="")
 {
 alert("Name must be filled out");
 return false;
 }
/* Validating email field */
var x=document.forms["myForm"]["email"].value;
var atpos=x.indexOf("@");
var dotpos=x.lastIndexOf(".");
if (atpos<1 || dotpos<atpos+2 || dotpos+2>=x.length)
 {
 alert("Not a valid e-mail address");
 return false;
 }
}

STEP #3

Back-end [PHP]

> Create a new PHP file in your favourite text editor.

> Get the submitted form elements:

1
2
3
4
5
<?php
//get the form elements and store them in variables
$name=$_POST["name"];
$email=$_POST["email"]; 
?>

> Connect to your database:

1
2
3
4
5
6
7
8
<?php
//establish connection
$con = mysqli_connect("Host","User name","Password","DB name");
//on connection failure, throw an error
if(!$con) { 
die('Could not connect: '.mysql_error());
}
?>

> Insert the form values into the database:

1
2
3
4
<?php
$sql="INSERT INTO `DB name`.`Table name` ( `name` , `email_id` ) VALUES ( '$name','$email')";
mysqli_query($con,$sql);
?>

> After the database is successfully updated, you need to redirect the user to a page with a success message(which I have assumed you have created via Dashboard). You can do this by,

1
2
3
4
<?php
//Redirects to the specified page
header("Location: http://your-success-page-url");
?>

Now you have successfully created your php script which will be called in the action attribute. Upload this php file inside the wordpress directory.
NOTE: In the form action, I have used “../process.php” because the php file is one level above the page which contains the form.

STEP #4

Create a new page with a form successful submission message.
Make sure the URL of this page is the one which is specified in the header() of the php script.

That is it! You have successfully created a custom form and connected it with a database!